This is not the current version. View the latest documentation
The Realm Object Server synchronizes Realms between devices, provides authentication and access control services for Realms, and offers “serverless” event processing through Realm Functions.
Install Realm Object Server
Comprehensive documentation on the Realm Object Server can be found in our platform docs.
Access Control
Realm Object Server includes access control mechanisms to restrict which users can sync which Realm files. In order to grant a user access to a Realm, Realm Object Server authenticates the user to verify their identity, then authorizes that the user has the correct permissions to access the Realm.
- Realm Object Server uses configurable authentication providers to validate user credentials and authenticate users. A client connects to the server using some user credentials, and these are given to an appropriate provider for validation. If the credentials are valid, the user is granted access to Realm Object Server. A new user account is created if the credentials are not coupled to an existing account.
- After the client is granted access as a user, it can request read or write access to a specific path identifying a Realm. If the user has the requested access permissions for the given path, the user is authorized to access the Realm, and normal sync operations can begin.
Authentication
Authentication providers allow developers to utilize third-party authentication mechanisms to control access to Realm apps that go beyond Realm’s own username/password mechanism. Realm supports Facebook, Google, and Apple’s iCloud.
These third-party providers currently operate at the single-server level, and will need to be set up on each server that needs to make use of a given authentication mechanism. The setup is done by providing a set of key-value pairs that identify the authentication mechanism and the required keys/secrets.
This information goes into the auth.providers section of the Realm configuration.yml file.
Below are examples that demonstrate how to integrate each of these third-party authentication providers and where applicable links to the developer pages for those services. Complete examples of all authentication providers can be found in the Realm Object Server configuration.yml file.
Username/Password
This standard authentication method is always enabled.
After getting Google OAuth2.0 API Access, uncomment the google provider and add your client ID:
google:
clientId: '012345678901-abcdefghijklmnopqrstvuvwxyz01234.apps.googleusercontent.com'To enable Facebook Authentication, just uncomment the facebook provider:
facebook: {}Note that the Realm Object Server must be able to access Facebook APIs to validate received client tokens.
Azure Active Directory
Uncomment the azuread provider and add your Directory ID from the Azure Portal (under “Properties”):
azuread:
  tenant_id: '81560d038272f7ffae5724220b9e9ea75d6e3f18'
iCloud
You will need to create a public key for the Realm Object Server to access CloudKit. The steps are slightly different for Linux and macOS. Note that iCloud client support is only available on Apple platforms: iOS, macOS, tvOS, and watchOS.
-
Open a terminal and
cdto the Realm Mobile Platform directory. -
Generate a private key:
openssl ecparam -name prime256v1 -genkey -noout -out cloudkit_eckey.pem -
Generate a public key to be submitted to the CloudKit Dashboard:
openssl ec -in cloudkit_eckey.pem -pubout
-
Generate a private key:
sudo openssl ecparam -name prime256v1 -genkey -noout -out /etc/realm/cloudkit_eckey.pem -
Generate a public key to be submitted to the CloudKit Dashboard:
openssl ec -in /etc/realm/cloudkit_eckey.pem -pubout
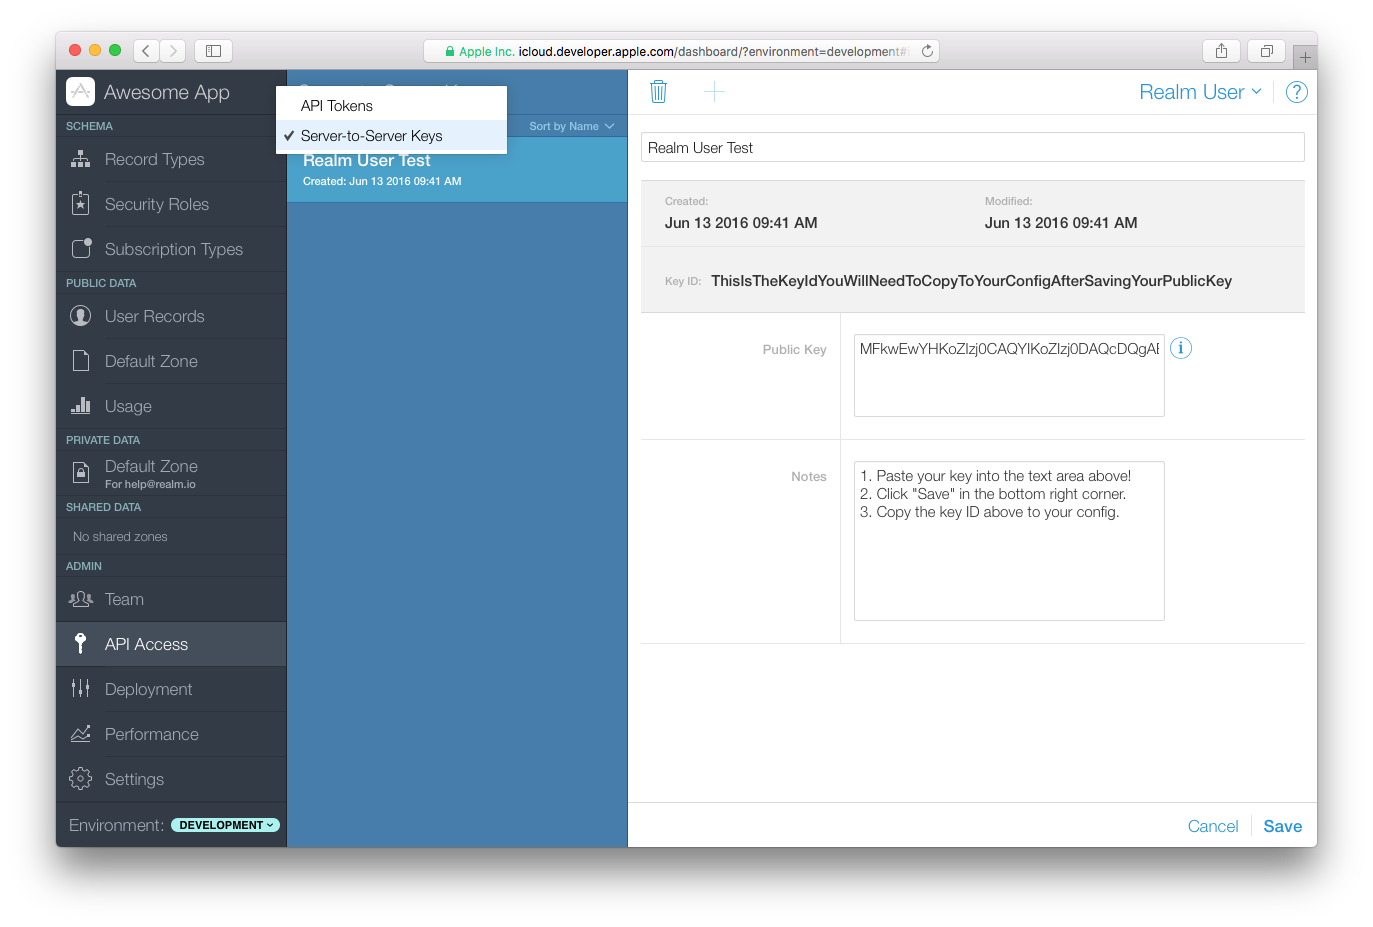
Log in to Apple’s CloudKit Dashboard and select your application. In the left-hand side of the dashboard, select “API Access”, then select “Server-to-Server Keys”. Select “Add Server-to-Server Key”. Give the new key a name and paste in the public key generated above. Click “Save.” After a few seconds, a key will be generated and displayed in the “Key ID” section at the top of the page.
Security note: Create a new private key for each application you plan on using with Realm CloudKit authentication. Reusing private keys can compromise all Realms using the shared key if the private key itself becomes compromised or needs to be revoked.
Uncomment the cloudkit provider in the configuration file and enter the Key ID, private key path, container ID and environment information:
cloudkit:
  key_id: '0123456789abcdef0123456789abcdef0123456789abcdef0123456789abcdef'
  private_key_path: 'cloudkit_eckey.pem'
  container: "iCloud.io.realm.exampleApp.ios"
  # For production deployment on the App Store, you must specify 'production'
  environment: 'development'
Please ensure the path to the private_key_path is correct. If you followed the steps above, on Linux the path will be /etc/realm/cloudkit_eckey.pem.
Custom Authentication
The Realm Object Server supports the ability to use external authentication providers. This allows users to authenticate users against legacy databases or APIs, or integrate with providers that are not supported out-of-the-box by the Realm Object Server. This section of the manual will walk you through the process of writing and setting up a third-party authentication provider.
The basics of authentication in the Realm Object Server is simple: when a client tries to login, it provides credentials to the server. The server checks those credentials, typically against an external server or API, and grants rights to the client based on the response.
Custom authentication providers can be installed anywhere. By default, the server is configured to look in /usr/local/lib/realm/auth/providers. An authentication provider takes the shape of a Node.js script which uses one of our development APIs.
Writing an authentication provider
Any NPM dependencies your authentication provider relies on must be installed before starting the Realm Object Server. If your custom authentication provider fails with error messages similar to “Expected implementation for [provider name] to be a function, but got object,” check to make sure all your dependencies are available!
Create the directory indicated above if it doesn’t exist yet, and create a file with a .js extension. The filename itself can be anything you want, although we recommend using something significant for the type of authentication provider you are implementing (e.g., github.js). In this example, we will create the FooAuth sample provider, which asks an external server to verify the token given by the client.
// fooauth.js

/**
 * This will be called when the server is started.
 *
 * It should return the constructor for the authentication provider.
 *
 * @param {object} deps - The dependencies passed from the running server
 *                        to this implementation.
 * @param {function} deps.BaseAuthProvider - the base class to use
 * @param {object} deps.problem - a set of exceptions to throw on failure
 * @param {object} deps.models - the models of the admin-Realm
 * @returns {function}
 */
module.exports = function(deps) {
  return class FooAuthProvider extends deps.BaseAuthProvider {

    // return name of this custom authentication provider
    static get name() {
      return 'custom/fooauth';
    }

    // ensure required default options are set (optional function)
    static get defaultOptions() {
      return {
        server: 'https://my.auth.server.example',
      }
    }

    constructor(name, options, requestPromise) {
      super(name, options, requestPromise);

      this.httpMethod = 'GET';
    }

    // perform the authentication verification
    verifyIdentifier(req) {
      // The token submitted by the client
      const token = req.body.data;

      // options for the HTTP request
      const httpOptions = {
        uri: `${this.options.server}/api/auth?token=${token}`,
        method: this.httpMethod,
        json: true,
      };

      // make request to external provider and return result
      return this.request(httpOptions)
        .catch((err) => {
          // Please see src/node/services/problem/http_problem.js
          // for other error cases
          throw new deps.problem.HttpProblem.Unauthorized({
            detail: `Something bad happened: ${err.toString()}`,
          });
        })
        .then((result) => {
          // assume user ID value is in the `userId` JSON key returned
          return result.userId;
        });
    }
  };
}
We begin by defining a new class for our authentication provider, FooAuthProvider, which extends the BaseAuthProvider class. This gives us access to a promise-based HTTP request. Let’s walk through the methods our provider must define.
-
The
name()function simply returns the name of the authentication provider. It must begin withcustom/, to avoid potential name conflicts between first-party and third-party providers.You can use this name to define options in the
configuration.ymlfile for the Realm Object Server.custom/fooauth: server: 'https://newserver.example'These options become available to your provider under
this.options(e.g.,this.options.server). -
The
defaultOptions()function is optional. It returns default values for any configuration file variables your code requires, in case they’re not defined. -
The
constructorreceives the name, options, and the request Promise. It can set instance variables, verify configuration file values, and perform any other initialization tasks. -
The
verifyIdentifier()function is the heart of your provider. It’s called with the HTTP request, and it should return a unique user ID that will be used by Realm to either create a new user on the Realm Object Server or log in an existing user, depending on whether the user is already in the system or not.In this example, we fill in
httpOptionsusing theserverconfiguration variable and thehttpMethodvariable defined in the constructor, then make an HTTP request to our provider with that information. On an error, we throw an exception fromdeps.problem; on success, we return the user ID.
For a real world example, see our AWS Cognito provider on Github:
- cognito.js (Server side)
- AWSCognitoAuthenticationProvider.swift (Part of realm-loginkit)
Configuring the authentication provider
Now that custom authentication provider has been written, the configuration needs to be updated to tell the server to load it. This is done by adding a few lines to the global configuration file:
# configuration.yml
auth:
  providers:
    # The name of a custom authentication provider must start with `custom/` to
    # differentiate it from ROS-vendored authentication providers.
    custom/fooauth:
      # This refers to the `fooauth.js` file.
      implementation: fooauth
      # This is an option, as defined in the custom authentication provider.
      auth_server: 'https://another.server.example'
By simply adding this configuration, the ROS will automatically load the JS file and enable the authentication provider.
Using the custom provider on the client
All the client SDKs support custom authentication out of the box. It is only a matter of sending the correct information using the right login function. For more details, consult the documentation for your language SDKs, and find “Authentication” under the “Sync” heading.
Authorization
Each Realm managed by the Realm Object Server has access permissions that can be set on it; permissions are the fundamental authorization control for the server. Permissions are set on each Realm using three boolean flags:
- The
mayReadflag indicates the user can read from the Realm. - The
mayWriteflag indicates the user can write to the Realm. - The
mayManageflag indicates the user can change permissions on the Realm for other users.
Permissions for a Realm can be set on a default basis and a per-user basis. When a user requests access for a Realm, first the Realm Object Server checks to see if there are per-user permissions set for that user on that Realm. If there are no per-user permissions set for that user, the default permissions for the Realm are used. For example, a Realm might have mayRead set true by default, with individual users being granted mayWrite permissions.
By default, a Realm is exclusive to its owner: the owner has all permissions on it, and no other user has any permissions for it. Other users must be explicitly granted access.
Write-only permissions (i.e., mayWrite set without mayRead) are not currently supported.
Note that admin users are always granted all permissions to all Realms on the Realm Object Server.
The Management Realm
All access management operations are performed by writing special permission change objects to a Management Realm. This is a special synchronized Realm; objects created in it are effectively requests to the server to change default and per-user permissions on other Realms.
Consult the documentation for the binding you’re using to learn how to access the Management Realm. Generally, it’s retrieved by calling a method on a user object (e.g., SyncUser.managementRealm() for Swift).
Permission Change Objects
A user adds PermissionChange objects to the Management Realm to change permissions; both per-user permissions and default Realm permissions are set the same way. The user must have the mayManage permission for the Realm they’re trying to manage to make modifications.
There are five fields in PermissionChange objects. The first two are required; the permission fields are all optional:
realmUrl(string): the URL of the Realm, or*for all Realms owned by the requesting useruserId(string): the identify of the user whose permissions are being modified, or*for the Realm default permissionsmayRead(boolean): read access to the RealmmayWrite(boolean): write access to the RealmmayManage(boolean): management permission for the Realm
If one of the may* flags is not set in the PermissionChange object, it will remain unchanged. Per-user permissions always take higher priority than default permissions, so changing the default permissions for a Realm will not remove permissions already set on individual users.
The PermissionChange object will be modified by the Realm Object Server after it attempts to apply the permissions. If the permission change succeeds, the statusCode field will be populated and set to 0, and a description may be added in the statusMessage field. If an error occurs, statusCode will be set to a value greater than 0, and the error message will be in statusMessage.
For the specifics of how to create and use PermissionChange objects, please consult the documentation for your client binding.
Permission Offer and Response
The PermissionOffer and PermissionOfferResponse mechanism allows flexible sharing management between users. A PermissionOffer object functions similarly to a PermissionChange object, but creates a token that can be sent to another user to grant them permissions. The steps are, roughly:
- Create the
PermissionOfferobject and add it to the Management Realm. - Wait for the server to process the object and populate a
tokenproperty on it. - Send the
tokento another user via an external method: email, chat, your own API, etc. - The receiving user creates a
PermissionOfferResponseobject with the token and adds it to their Management Realm. - Wait for the server to process the object and return a successful status.
- Use the
realmUrlproperty now populated on thePermissionOfferResponseobject for syncing with that Realm.
Consult the documentation for your client binding for details.
The Admin Realm
Ultimately, changes made via the Management Realm are made to a single global, authoritative store containing the complete set of permissions for all Realm files and users controlled by a Realm Object Server instance. This Admin Realm is only modifiable by the Object Server itself, and is not accessible to Realm Mobile Database applications.
High Availability
One of the unique aspects of Realm Mobile Platform is that it is designed to be offline-first. Architecturally, clients retain a local copy of data from the server and read or write directly to their copy. The client SDK then sends the changes asynchronously when network connectivity is available and Realm Object Server automatically integrates these changes in a deterministic manner. Such a system is inherently highly available from the perspective of the client. Reads and writes can always occur locally irrelevant of the network conditions or server operations.
Realm is currently working on a clustering solution that supports automatic failover. This functionality will be available in the Enterprise Edition. To learn more and get early access, please contact us.
Backup
The Realm Object Server provides one or two backup systems, depending on your Edition.
- The manual backup system is included in all versions of Realm Mobile Platform via a command line utility. It can be triggered during server operations to create a copy of the data in the Object Server.
- The continuous backup system, available only in the Enterprise Edition, is a backup server running alongside the main process in the Realm Object Server. It continuously watches for changes across all synchronized Realms and sends changes to one or more backup clients.
Both systems create a directory of Realms from which the Realm Object Server can be restarted after a server crash. The backed up data includes the user Realms, all user account information, and all other metadata used by the Realm Object Server. Both manual and continuous backups can be made from a running Realm Object Server without taking it offline.
The following documentation applies to the Manual Backup feature. For more about Continous Backup, read Continuous Backup in the Enterprise Edition documentation.
The manual backup is a console command that backs up a running instance of the Realm Object Server. This command can be executed on a server without shutting it down, any number of times, in order to create an “at rest” backup that can be stored on long-term storage for safekeeping. In order to be as agnostic as possible regarding the way the backup will be persisted, the command simply creates a directory structure containing everything the server needs to get started again in the event of a disk failure.
It is recommended that the resulting directory is compressed and sent to an off-site location, such as Amazon S3 or Online C14.
Because Realms can be modified during the backup process, the backup command uses Realm’s transaction features to take a consistent snapshot of each Realm. However, since the server is running continuously, the backed up Realms do not represent the state of the server at one particular instant in time. A Realm added to the server while a backup is in progress might be completely left out of the backup. Such a Realm will be included in the next backup.
To run realm-backup at the command line, type:
realm-backup SOURCE TARGETSOURCEis the data directory of the Realm Object Server (typically configured in/etc/realm/configuration.ymlunderstorage.root_path).TARGETis the directory where the backup files will be placed. This directory must be empty or absent when the backup starts for safety reasons.
After the backup command completes, TARGET will be a directory with the same sub directory structure as SOURCE and a backup of all individual Realms.
Server Recovery From A Backup
If the data of a Realm Object Server is lost or otherwise corrupted, a new Realm Object Server can be restarted with the backed up data. This is done simply by stopping the server and copying the latest backup directory (e.g., the TARGET directory in the manual backup procedure, or the storage.root_path directory specified by a continuous backup client) into the Realm Object Server’s data directory (e.g., the SOURCE directory in the manual backup procedure). After the backup has been fully copied into the Realm Object Server’s data directory, the server may be restarted.
Client Recovery From A Backup
Any data added to the Object Server after its most recent backup will be lost when the server is restored from that backup. Since Realm Mobile Database clients communicate with the Realm Object Server continuously, though, it’s possible for them to have been updated with that newer data that’s no longer on the server.
In the case of such an inconsistency, the Realm Object Server will send an error message to the client, and refuse to synchronize data. The error messages relating to synchronization inconsistencies are:
- 207 “Bad server file identifier (INTENT)”
- 208 “Bad client file identifier (IDENT)”
- 209 “Bad server version (IDENT, UPLOAD)”
- 211 “Diverging histories (IDENT)”
If the client receives one of these error messages, the only way to continue synchronization from the server is to start over: erase all the data in the local copy of the Realm that received the error, and re-sync with the server. This way, the client will have all the data (and only the data) on the Realm Object Server and will be in a consistent state.
Note that if this happens, the client will lose any data that only existed on its local, inconsistent copy of the synchronized Realm (i.e., data that was added to it between the time the Realm Object Server crashed and was restored from its backup). The best way to minimize this potential data loss is to use the continuous backup system. If you can’t do that, run the manual backup system frequently.
Troubleshooting
Verify Port Access
Certain factors may impact external (non-localhost) access to the Realm Object Server’s synchronization facility, and the Realm Dashboard. In order to enable access, it may be necessary to open port 9080 on your server(s).
Using the standard Linux tools, these commands will open access to the port:
sudo iptables -A INPUT -p tcp -m tcp --dport 9080 -j ACCEPT
sudo service iptables save
Please refer to the CentOS 6 Documentation for more information regarding how to configure your firewall.
sudo firewall-cmd --get-active-zones
sudo firewall-cmd --zone=public --add-port=9080/tcp --permanent
sudo firewall-cmd --reload
sudo ufw allow 9080/tcp
sudo ufw reloadIf your environment does not use your distribution’s standard firewall, you will have to modify these instructions to fit your environment.
Configuration Errors
Generally the default settings will work well for most installations. Most settings inside the Realm Object Server configuration file are commented out (the system has pre-programmed default values) and show examples of how they can be to customized. If the configuration file has been customized and there is a problem, error messages will be written to the default log location (in the terminal window under macOS or /var/log/realm-object-server.log on Linux systems).
If the Realm Object Server will not start, an error in the configuration file is usually the cause. To debug the config file, you can use the built-in checker by starting a terminal and using:
realm-object-server --check-configuration /etc/realm/configuration.ymlIf running under macOS, replace the configuration file path with the path to your configuration.yml.
When an error occurs, the server’s parser will print a detailed error message stating the problem and possibly highlighting the line the error occurred on. Once all errors are corrected, the server will start; stop the server by pressing ^C and then start it normally by rebooting the system or restarting the Realm Object Server using systemd on Linux or the start-object-server.command on macOS.
Error messages are usually self-explanatory, but here are some potential hints:
- To be able to run Realm Object Server, the following settings are mandatory:
- Storage root directory: Where Realm Object Server should store all its files. Please set
storage.root_pathor give the--rootCLI argument. The directory must exist before ROS can start. - Authentication key pair: For securing access to Realm Object Server to only authenticated clients. Please set
auth.private_key_pathor give the--private-keyCLI argument, and please setauth.public_key_pathor give the--public-keyCLI argument. The keys given must be in PEM format and they must be a matching pair.
- Storage root directory: Where Realm Object Server should store all its files. Please set
-
The configuration for listening ports must not be overlapping, meaning that
listen_portvalues must be unique in the file. Additionally, the ports must not be bound in another process. - The HTTPS proxy will only start if given paths to a valid certificate and private key in
proxy.https.certificate_pathandproxy.https.private_key_path. The certificate and private key must be in PEM format and they must be a matching pair. The certificate cannot be self-signed.
Operational Errors
Occasionally it can be useful for debugging purposes to check the Realm Object Server logs - which are in the terminal window on macOS or /var/log/realm-object-server.log on Linux systems. Realm Object Server produces two specific classes of error and warning diagnostics that may be useful to system admins and developers.
Session Specific Errors
-
204 “Illegal Realm path (BIND)” Indicates that the Realm path is not valid for the user.
-
207 “Bad server file identifier (IDENT)” Indicates that the local Realm specifies a link to a server-side Realm that does not exist. This is most likely because the server state has been completely reset.
-
211 “Diverging histories (IDENT)” Indicates that the local Realm specifies a server version that does not exists. This is most likely because the server state has been partially reset (for example because a backup was restored).
Client Level Errors
-
105 “Wrong protocol version (CLIENT)” The client and the server use different versions of the sync protocol due to a mismatch in upgrading.
-
108 “Client file bound in other session (IDENT)” Indicates that multiple sync sessions for the same client-side Realm file overlap in time.
-
203 “Bad user authentication (BIND, REFRESH)” Indicates that the server has produced a bad token, or that the SDK has done something wrong.
-
206 “Permission denied (BIND, REFRESH)” Indicates that the user does not have permission to access the Realm at the given path.
Conflict Resolution
One of the defining features of mobile is the fact that you can never count on being online. Loss of connectivity is a fact of life, and so are slow networks and choppy connections. But people still expect their apps to work!
This means that you may end up having two or more users making changes to the same piece of data independently, creating conflicts. Note that this can happen even with perfect connectivity as the latency of communicating between the phone and the server may be slow enough that they can end up creating conflicting changes at the same time.
What Realm does in this case is that it merges the changes after the application of specific rules that ensure that both sides always end up converging to the same result even, though they may have applied the changes in different order.
This means that you no longer have the kind of perfect consistency that you could have in a traditional database, what you have now is rather what is termed “strong eventual consistency”. The tradeoff is that you have to be aware of the rules to ensure the consistent result you want, but the upside is that by following a few rules you can have devices working entirely offline and still converging on meaningful results when they meet.
At a very high level the rules are as follows:
-
Deletes always win. If one side deletes an object it will always stay deleted, even if the other side has made changes to it later on.
-
Last update wins. If two sides update the same property, the value will end up as the last updated.
-
Inserts in lists are ordered by time. If two items are inserted at the same position, the item that was inserted first will end up before the other item. This means that if both sides append items to the end of a list they will end up in order of insertion time.
Primary Keys
A primary key is a property whose value uniquely identifies an object in a Realm (just like a primary key in a conventional relational database is a field that uniquely identifies a row in a table). Primary keys aren’t required by Realm, but you can enable them on any object type. Add a property to a Realm model class that you’d like to use as the primary key (such as id), and then let Realm know that property is the primary key. The method for doing that is dependent on the language you’re using; in Cocoa, you override the primaryKey() class method, whereas Java and .NET use annotations. (Consult the documentation for your language SDK for more details.)
Once a Realm model class has a primary key, Realm will ensure that no other object can be added to the Realm with the same key value. You can update the existing object; in fact, you can update only a subset of properties on a specified object without fetching a copy of the object from the Realm. Again, consult the documentation for your language SDK for specifics.
For more information, read the Primary Keys Tutorial.
Strings
Note: Strings are not exposed in client APIs yet.
Strings are special in that you can see them both as scalar values and as lists of characters. This means that you can set the string to a new string (replacing the entire string) or you can edit the string. If multiple users are editing the same string, you want conflicts to be handled at the character level (similar to the experience you would have in something like Google docs).
Counters
Note: Counters are not exposed in client APIs yet.
Using integers for counting is also a special case. The way that most programming languages would implement an increment operation (like v += 1), is to read the value, increment the result, and then store it back. This will obviously not work if you have multiple parties doing it simultaneously (they may both read 10, increment it to 11, and when it merges you would get the result of 11 rather than the intended 12).
To support this common use case we offer a way to express the intent that you are incrementing (or decrementing) the value, giving enough hints to the merge that it can reach the correct result. Just as with the strings above, it gives you the choice of updating the entire value, or editing it in a way that conveys more meaning, and allow you to get more precise control of the conflict resolution.
Custom Conflict Resolution
The standard way to do custom conflict resolution is to change the value into a list. Then each side can add its updates to the list and apply any conflict resolution rules it wants directly in the data model.
You can use this technique to implement max, min, first write wins, last write wins and pretty much any kind of resolution you can think of.
Installing/Upgrading
To get started with the Realm Mobile Platform, head over to our platform docs.
Event Handling
Whenever a change is synchronized to the server, it triggers a notification which allows you to run custom server-side logic in response to the change. The notification will inform you about the virtual path of the updated Realm and provide the Realm object and fine-grained information on which objects changed. The change set provides the object indexes broken down by class name for any inserted, deleted, or modified object in the last synchronized transaction.
Creating an Event Handler
To use Realm Event Handling, you’ll need to create a small Node.js application.
Create a directory to place the server files, then create a file named package.json. This JSON file is used by Node.js and npm, its package manager, to describe an application and specify external dependencies.
You can create this file interactively by using npm init. You can also fill in a simple skeleton file yourself using your text editor:
{
    "name": "MyApp",
    "version": "0.0.1",
    "main": "index.js",
    "author": "Your Name",
    "description": "My Cool Realm App",
    "dependencies": {
        "realm": "^1.8.0"
    }
}
We specify the Realm Mobile Platform as version 1.8 or higher. If you have other dependencies for your application, go ahead and specify them in the dependencies section of this file.
After the package.json file is configured properly, type:
npm installto download, unpack and configure all the modules and their dependencies.
Your event handler will need to access the Object Server with administrative privileges, so you’ll need to get the Object Server’s admin token. Under Linux, view the token with:
cat /etc/realm/admin_token.base64On macOS, the token is stored in the realm-object-server folder, inside the Realm Mobile Platform folder. Navigate to that folder and view the token:
cd path-to/realm-mobile-platform
cat realm-object-server/admin_token.base64
A sample index.js file might look something like this. This example listens for changes to a user-specific private Realm at the virtual path /~/private. It will look for updated Coupon objects in these Realms, verify their coupon code if it wasn’t verified yet, and write the result of the verification into the isValid property of the Coupon object.
var Realm = require('realm');

var ACCESS_TOKEN = "eyJhbGciOiJSUzI1NiIsInR5cCI6IkpXVCJ9...";

// Unlock Professional Edition APIs
Realm.Sync.setFeatureToken(ACCESS_TOKEN);

// Insert the Realm admin token here
//   Linux:  cat /etc/realm/admin_token.base64
//   macOS:  cat realm-object-server/admin_token.base64
var ADMIN_TOKEN = 'ADMIN_TOKEN';

// the URL to the Realm Object Server
var SERVER_URL = 'realm://127.0.0.1:9080';

// The regular expression you provide restricts the observed Realm files to only the subset you
// are actually interested in. This is done in a separate step to avoid the cost
// of computing the fine-grained change set if it's not necessary.
var NOTIFIER_PATH = '^/.*/private$';

// The handleChange callback is called for every observed Realm file whenever it
// has changes. It is called with a change event which contains the path, the Realm,
// a version of the Realm from before the change, and indexes indication all objects
// which were added, deleted, or modified in this change
function handleChange(changeEvent) {
  // Extract the user ID from the virtual path, assuming that we're using
  // a filter which only subscribes us to updates of user-scoped Realms.
  var matches = changeEvent.path.match(/^\/([0-9a-f]+)\/private$/);
  var userId = matches[1];

  var realm = changeEvent.realm;
  var coupons = realm.objects('Coupon');
  var couponIndexes = changeEvent.changes.Coupon.insertions;

  for (var couponIndex of couponIndexes) {
    var coupon = coupons[couponIndex];
    if (coupon.isValid !== undefined) {
      var isValid = verifyCouponForUser(coupon, userId);
      // Attention: Writes here will trigger a subsequent notification.
      // Take care that this doesn't cause infinite changes!
      realm.write(function() {
        coupon.isValid = isValid;
      });
    }
  }
}

// create the admin user
var adminUser = Realm.Sync.User.adminUser(adminToken);

// register the event handler callback
Realm.Sync.addListener(SERVER_URL, adminUser, NOTIFIER_PATH, 'change', handleChange);

console.log('Listening for Realm changes');
The heart of the event handler is the handleChange() function, which is passed a changeEvent object. This object has four keys:
path: The path of the changed Realm (used above withmatchto extract the user ID)realm: the changed Realm itselfoldRealm: the changed Realm in its old state, before the changes were appliedchanges: an object containing a hash map of the Realm’s changed objects
The changes object itself has a more complicated structure: it’s a series of key/value pairs, the keys of which are the names of objects (i.e., Coupon in the above code), and the values of which are another object with key/value pairs listing insertions, deletions, and modifications to those objects. The values of those keys are index values into the Realm. Here’s the overall structure of the changeEvent object:
{
  path: "realms://server/user/realm",
  realm: <realm object>,
  oldRealm: <realm object>,
  changes: {
    objectType1: {
      insertions: [ a, b, c, ...],
      deletions: [ a, b, c, ...],
      modifications: [ a, b, c, ...]
    },
    objectType2: {
      insertions: [ a, b, c, ...],
      deletions: [ a, b, c, ...],
      modifications: [ a, b, c, ...]
    }
  }
}
In the example above, we get the Coupons and the indexes of the newly inserted coupons with this:
var realm = changeEvent.realm;
var coupons = realm.objects('Coupon');
var couponIndexes = changeEvent.changes.Coupon.insertions;
Then, we use for (var couponIndex of couponIndexes) to loop through the indexes and to get each changed coupon.
Integrating With Another Service
For a complete example of integrating the Event Handling framework with another service (in this case, IBM Watson’s Bluemix), read the tutorial for the Scanner App.
Data Access
To retrieve the admin token on Linux:
cat /etc/realm/admin_token.base64On macOS the token is stored in the realm-object-server folder within the zip:
cat realm-object-server/admin_token.base64This can be used to synchronously construct a Realm.Sync.User object which can be passed into the Realm constructor to open a connection to any Realm on the server side.
// Open a Realm using the admin user
var adminToken = '3x4mpl3T0k3n…';
var adminUser = Realm.Sync.User.adminUser(adminToken);
var realm = new Realm({
  sync: {
    user: admin_user,
    url: 'realm://object-server-url:9080/my-realm',
  },
  schema: [{...}
  }]
});
Note that when used with an admin user, the Realm URL does not include the ~ character that resolves into the user ID for non-admin authentication; the admin user does not have a user ID. For non-admin authentication, read the Authentication section in the Object Server Access Control documentation.
Data Connector
translation missing: jp.documentation.realm-object-server.ee.alert
The Enterprise Edition of the Realm Object Server offers a Node.js-based adapter API that allows you to access all low-level Object Server operations and data. This can be used to let a synced Realm interact with an existing legacy database such as PostgreSQL: the Realm will also be kept in sync with the external database in real time. Client applications can use the Realm Mobile Database API and get the benefits of working with real-time, native objects.
The Adapter API is set up in a very similar fashion to the Event Handler API described above. Create a small Node.js application by creating a directory to place the server files, then create a package.json for npm dependencies or use npm init to create it interactively.
{
    "name": "MyApp",
    "version": "0.0.1",
    "main": "index.js",
    "author": "Your Name",
    "description": "My Cool Realm App",
    "dependencies": {
        "realm": "^1.8.0"
    }
}
After your other dependencies are specified, use npm install to download, unpack and configure the modules.
As with the event handler API, you’ll need to access the Object Server with administrative privileges, and will need to get the Object Server’s admin token. Under Linux, view the token with:
cat /etc/realm/admin_token.base64On macOS, the token is stored in the realm-object-server folder, inside the Realm Mobile Platform folder. Navigate to that folder and view the token:
cd path-to/realm-mobile-platform
cat realm-object-server/admin_token.base64
To use the Adapter API, the Node.js application you’re creating will act as a translator, receiving instructions from the Object Server and calling your external database’s API to read and write to it. A sample application might look like this:
var Realm = require('realm');

var ACCESS_TOKEN = "eyJhbGciOiJSUzI1NiIsInR5cCI6IkpXVCJ9...";

// Unlock Enterprise Edition APIs
Realm.Sync.setFeatureToken(ACCESS_TOKEN);

var adapterConfig = {
  // Insert the Realm admin token here
  //   Linux:  cat /etc/realm/admin_token.base64
  //   macOS:  cat realm-object-server/admin_token.base64
  admin_token: 'ADMIN_TOKEN',

  // the URL to the Realm Object Server
  server_url: 'realms://127.0.0.1:9080',

  // local path for the Adapter API file
  local_path: './adapter',

  // regular expression to limit which Realms will be observed
  realm_path_regex: '/^\/([0-9a-f]+)\/private$/'
};

class CustomAdapter {
  constructor(config) {
    this.adapter = new Realm.Sync.Adapter(
      config.local_path,
      config.server_url,
      Realm.Sync.User.adminUser(config.admin_token),
      config.realm_path_regex,

      // This callback is called any time a new transaction is available for
      // processing for the given path. The argument is the path to the Realm
      // for which changes are available. This will be called for all Realms
      // which match realm_path_regex.
      (realm_path) => {
        var current_instructions = this.adapter.current(realm_path);
        while (current_instructions) {
          // if defined, process the current array of instructions
          this.process_instructions(current_instructions);

          // call advance to progress to the next transaction
          this.adapter.advance(realm_path);
          current_instructions = this.adapter.current(realm_path);
        }
      }
    )
  }

  // This method is passed the list of instructions returned from
  // Adapter.current(path)
  process_instructions(instructions) {
    instructions.forEach((instruction) => {
        // perform an operation for each type of instruction
        switch (instruction.type) {
          case 'INSERT':
            insert_object(instruction.object_type, instruction.identity, instruction.values);
            break;
          case 'DELETE':
            delete_object(instruction.object_type, instruction.identity);
            break;
          // ... add handlers for all other relevant instruction types
          default:
            break;
        }
      })
  }
}
Each instruction object returned by Adapter.current has a type property which is one of the following strings. Two or more other properties containing data for the instruction processing will also be set.
INSERT: insert a new objectobject_type: type of the object being insertedidentity: primary key value or row index for the objectvalues: map of property names and property values for the object to insert
SET: set property values for an existing objectobject_type: type of the objectidentity: primary key value or row index for the objectvalues: map of property names and property values to update for the object
DELETE: delete an existing objectobject_type: type of the objectidentity: primary key value or row index for the object
CLEAR: delete all objects of a given typeobject_type: type of the object
LIST_SET: set the object at a given list index to an objectobject_type: type of the objectidentity: primary key for the objectproperty: property name for the list property to mutatelist_index: list index to setobject_identity: primary key or row number of the object being set
LIST_INSERT: insert an object in the list at the given indexobject_type: type of the objectidentity: primary key for the objectproperty: property name for the list property to mutatelist_index: list index at which to insertobject_identity: primary key or row number of the object to insert
LIST_ERASE: erase an object in the list at the given index: this removes the object- from the list but the object will still exist in the Realm
object_type: type of the objectidentity: primary key for the objectproperty: property name for the list property to mutatelist_index: list index which should be erased
LIST_CLEAR: clear a list removing all objects: objects are not deleted from the Realmobject_type: type of the objectidentity: primary key for the objectproperty: property name for the list property to clear
ADD_TYPE: add a new typeobject_type: name of the typeprimary_key: name of primary key property for this typeproperties: Property map as described in Realm.ObjectSchema
ADD_PROPERTIES: add properties to an existing typeobject_type: name of the typeproperties: Property map as described in Realm.ObjectSchema
CHANGE_IDENTITY: change the row index for an existing object: not called for objects with primary keysobject_type: type of the objectidentity: old row value for the objectnew_identity: new row value for the object
For full details, including all the instruction types and the data passed to them, consult the API reference for the Realm.Sync.Adapter class.
A PostgreSQL data connector is already implemented, and more are on the way, including MongoDB and Microsoft SQL Server. Any data connector can be customized to your application’s specific needs. If you’re a Realm Enterprise customer, contact your representative for more information.